My Blinkies
Feel free to grab my blinkie to display on your blog.


My Creative Team

Tut Writers Inc.

CT Member for


10 April 2010
Open Hearted

YOU WILL NEED:
* Paint Shop Pro and Animation Shop or similar. I used PSPXII but you should be able to make this tag in earlier versions.
* Tube of choice. I am using the artwork of Elias Chatzoudis. You can find his work HERE
* Flower, Ribbon and Frame of choice
* Font of choice - I used PeregroyJF which you can download it HERE
* Filters used were Xero Fritillary, MuRas Copies & Eyecandy Gradient Glow (can substitute with a white drop shadow).
* Mask of choice.
LETS START!
1. Open your tube and scrap supplies in PSP. Open your font (by double clicking on it in Windows Explorer) and minimise to use later.
2. Open a new image 400 x 400 with a white background.
3. Add a new raster layer. Flood Fill with a contrasting colour in your tube. I chose #eea8b3.
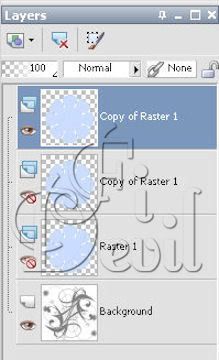
4. To apply your Mask of choice go to Layers - Load/Save Mask - Load Mask from Disk - Select your mask from the drop down list - Load. Right mouse click on the layers palette and Merge Group.


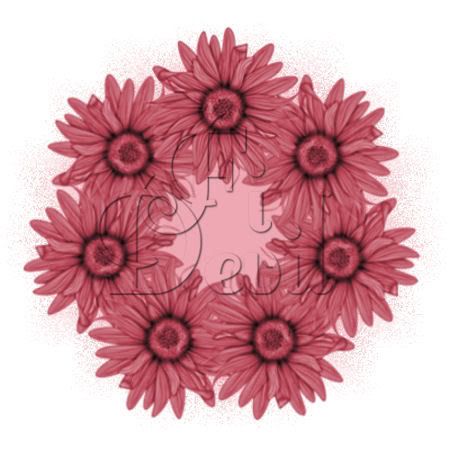
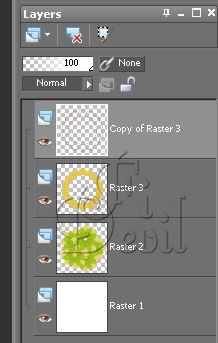
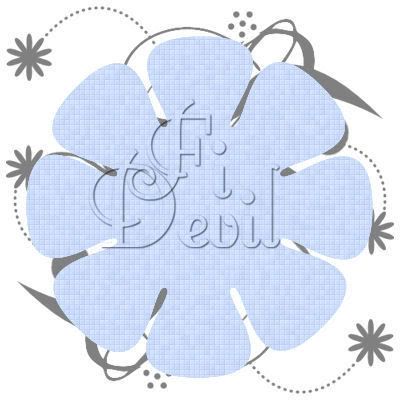
5. Copy and paste the flower of choice and place in the centre of the tag. Go to Effects - Plugins - MuRa's Meister - Copies.
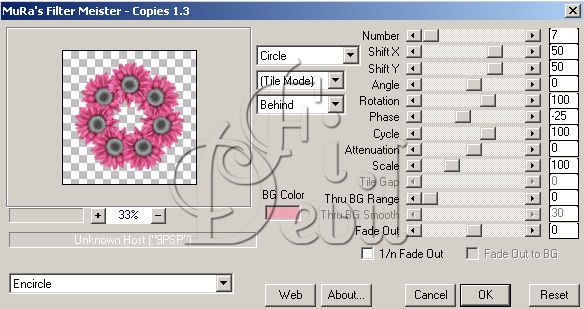
This is what you will now have on your layer.
6. Open your original frame and copy your frame and paste into your workspace. Close your original frame.
7. Go to your colour palette and select a darker contrasting colour from your tube and then select your rectangle shape and draw out a shape so that it sits just behind the frame layer. Move below the frame and convert to a raster layer. Duplicate this layer two times so that you have three layers.
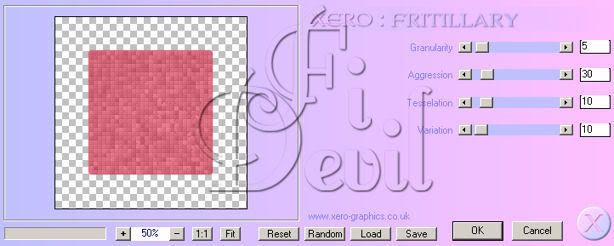
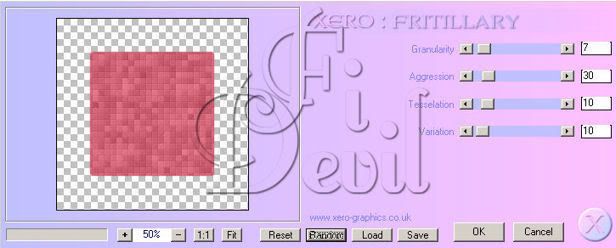
8. Select the first layer and then go Effects - Plugins - Xero - Fritillary. Using the settings below for the first layer.
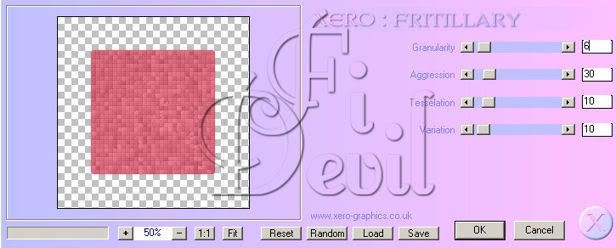
9. Hide the first layer and then select the second layer and go to Effects - Plugins - Xero - Fritillary.
10. Hide the second layer and then select the third layer and apply the following settings.
11. Now hide the third layer and unhide the first layer. Here is what you should have so far.

12. Activate your tube and copy and paste into the tag. Close your original image. Now move your image below the frame but above the background shape you have created.
13. Select your magic wand tool and select the frame layer and click in the middle of the frame. Go to Selections - Modify - Expand - Expand by 10 pixels.14. Select your tube layer and then go to Selections - Invert - Then hit your delete key which will remove any extra parts of the tube you dont want. Move the tube layer below the frame.
This is what you should now have.

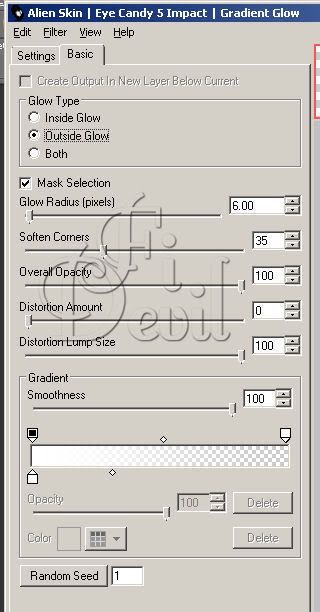
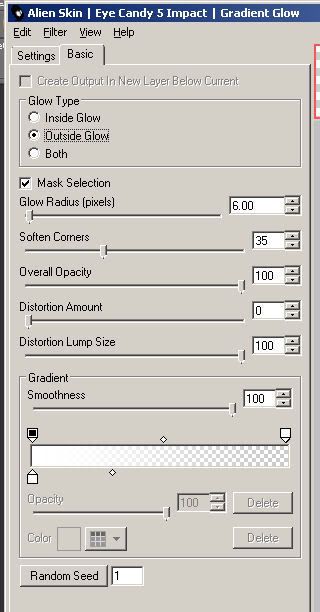
15. Add any embelishments that you desire onto the tag.16. Now put your name on the tag. Once the name is on your tag. Right mouse click on the layer and convert to Raster layer. Go to Effects - Plugins - Eye Candy - Gradient Glow and apply settings set out below.
17. Now add the copyright information. Now go to Edit - Copy Merged.
18. Open up Animation Shop and go to Edit - Paste - Paste as new animation.
19. Go back to Paint Shop Pro and hide the first layer of the shape and unhide the second layer. Go to Edit - Copy Merged.
20. Go to Animation Shop and go to Edit - Paste - After Current Frame. Do the same for the third layer.
Save your tag as a gif and you are finished.
I hope you enjoyed doing my tutorial.
This tutorial was written on 2nd June 2008.
Any resemblance to another tutorial is purely coincidental.
©Fi_Devil Tutorials

Fly Girl
This tutorial was written for those with a working knowledge of PSP
Written for PSP XI (Will work in other versions)
Select your tube, I chose the wonderful artwork from Elias Chatzoudis found My PSP Tubes
Scrap Kit called My Fantasy Scrap Kit from Passionate Scraps. Thanks to Mandy.
I used a mask from Candy's Treats for this tutorial found Here
Filters Used Eye Candy 5 Impact: Gradient Glow
Font of choice. I used Saginaw and Pixelette.
Lets Begin
1. Start by opening up a blank tag 500 x 500 and then flood fill with white. Open your scrap supplies you plan to use for your tag and minimise.
2. Go to Layers - New Raster Layer - Flood fill with a contrasting colour from your tube. Open up your Mask layer and go to Layers - New Mask Layer - From Image -
Select the Mask from the drop down list. Ensure that Invert Mask Data is selected as shown below.

3. On the Layers panel right mouse click on the mask layer and select Merge - Merge Group.
4. Open the tube you plan to use and reduce to size. I reduced mine by 85%. Minimise tube and we will come back to it later.
5. Open your doodles and copy and paste to your tag. Reduce to fit if needed. Place them where you think they will be of the most effect.
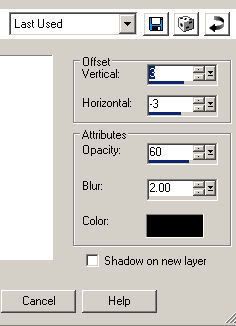
Add a drop shadow. O = 3 and H = -3, Opacity 60 and Blur 2 Colour Black.
6. Open your frame you will be using and copy and paste to your image. Resize if needed. Add drop shadow same settings as the doodles.
7. Select a paper from your scrap kit to match the tube or use a contrasting colour and select the circle preset shape. Make sure that the circle is just a little bit bigger than the centre of the frame. Right mouse click on the circle layer and convert to layer. I then wrote the words Fly Girl and duplicated and positioned where I wanted it to show on my paper. Merge your multiple layers so that you only have the one layer showing with the words. Now move these layers below the frame.
8. Open your tube and place between the scrap circle and the frame. Add a drop shadow to the tube as used above.
9. Add your embellishments to the tag as you desire. Adding drop shadow for effect.
10. Add your copyright information to the tag. I used Pixelette font for this. Size 8 Anti Alias off.
11. Now add your name. I set my font size to 72 anti alias Sharp with stroke width at 1.00.
Set your forground colour to a dark shade in your tag and the background colour for a lighter colour used in your tag.
12. Write your name and position where you want it on your tag.
Right mouse click on the layer with your name and convert to raster layer.
13. Next go to your Effects - Plugins - Eyecandy 5 Impact - Gradient Glow - Select the settings as shown below and then select OK.
14. Apply the same settings for the drop shadow to the name.
15. Now go to Layers - Merge - Merge All (Flatten)
Save as a JPG image.
You are finished.
I hope you enjoyed doing my tutorial.
This tutorial was written on 12th May 2008.
Any resemblance to another tutorial is purely coincidental.
©Fi_Devil Tutorials
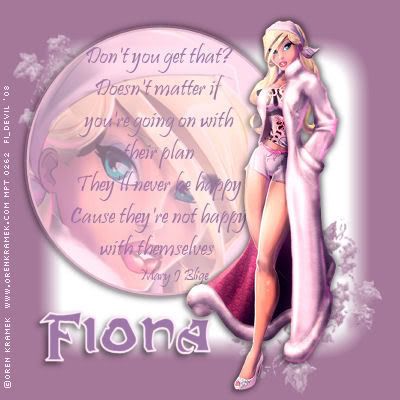
Pretty in Pink
This tutorial was written for those with a working knowledge of PSP
Written for PSP 9 (will work in other versions)
Supplies Needed
Mask of choice, mine was from a resource center which is no longer available.
Fonts of choice - I used Regular you can find it here
I also used Pristina (this is a paid for font)
Tube of choice
I used the lovely artwork of © Oren Kramek which you can purchase from MPT
Remember to save often
1. Open up an image with transparent background flood fill with white.
2. Open up the mask supplied and minimise.
3. Create a new raster layer and flood fill with a background colour
to match your tube. I used #a57799 now go to layers, new mask layer, from image and
select the mask, (I used) tp_edge15 from the drop down list. Tick the box to source luminance and invert mask data. In your layers palette delete the mask layer and merge group.
4. Using two colours from your tube, set your foreground colour to another
dark shade on your tube and the background to a lighter shade in your tube.
5. Now select your circle shape and with the line width set to 3 and line style as solid draw out your circle so that it covers a good portion of the tag.
6. Select your tube you are going to use for the tag and go to >Image - Resize - Increase the size so that the image will not be distorted but large enough to fill the circle. I enlarged my image in the second image by 150%.
7. Select your magic tool and select the circle. Go to your tube and copy the tube and paste as a new layer on your tag. Make sure that your tube layer is still active.
8. Go so selections - select Invert then hit your delete button.
Now reduce the opacity of the image.
9. Hide all the other layers in your layer palette other than the circle and the image and then go to Layers - Merge - Visible.
10. Select a dark colour from your tube and type in the lyrics from a song you like. I chose the lyrics from Mary J Blige. Using a font of your choice. I used Pristina font set at size 14.
Don't you get that?
Doesn't matter if
you're going on with
their plan
They'll never be happy
Cause they're not happy
with themselves.
Doesn't matter if
you're going on with
their plan
They'll never be happy
Cause they're not happy
with themselves.
11. Resize your tube to fit onto your tag and place where you would like it.
I resized mine by 85%. Apply drop shadow to the image. Effects - 3D Effects - Drop Shadow - V3 & H-3 - O50 & Blur 8. Make sure that shadow on new layer is unticked.
12. Now add your © copyright information and your name I used Regular font size 48 for my name, using the dark colour for the background colour and contrasting colour for the stroke width set at 2. Apply the same drop shadow to your name. Go to Layers - Merge - Merge all (Flatten) and save as a jpg image.
You are finished.
I hope you enjoyed doing my tutorial.
This tutorial was written on 4th January, 2008.
Any resemblance to another tutorial is purely coincidental.
© Fi_Devil Tutorials
This tutorial was written on 4th January, 2008.
Any resemblance to another tutorial is purely coincidental.
© Fi_Devil Tutorials
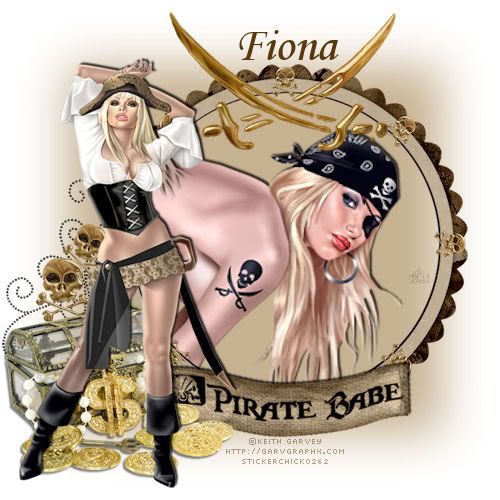
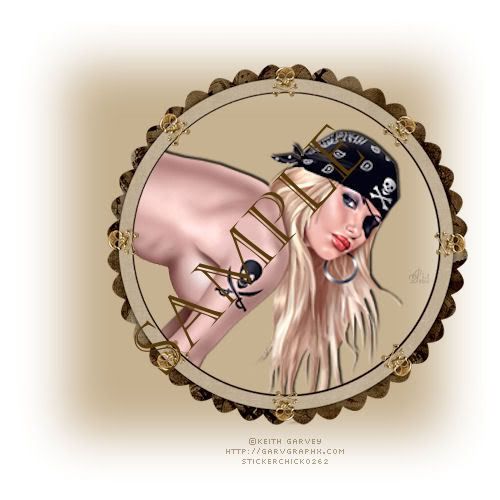
Pirates Alive
This tutorial was written for those who have a working knowledge of Paint Shop Pro.
YOU WILL NEED:
* Paint Shop Pro. I used PSPXII but you should be able to make this tag in earlier versions.
* Tubes of choice. I am using the artwork of Keith Garvey. You can get it at PTE.
* Scrap Kit by the talented Yarrow. Thank you Yarrow for allowing me to use your great Kit. This kit can be purchased Here.
* Font of choice - I used Monotype Corsiva. This is one of the Windows fonts so you should have it. If not you can purchase it Here.
LETS START!
1. Open your tubes and scrap kit in PSP. Open your font (by double clicking on it in Windows Explorer) and minimise to use later.
2. Open a new image 500 x 500 with a white background.
3. Activate your selection tool and click on the square preset shape. Make sure your Foreground is set to Null and the Background is set to a contrasting colour to your tube. I used #C6B190. Draw out the size you want.

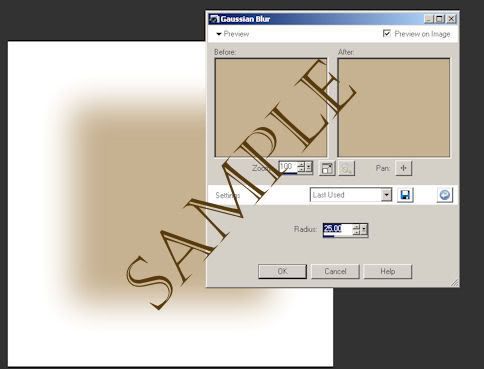
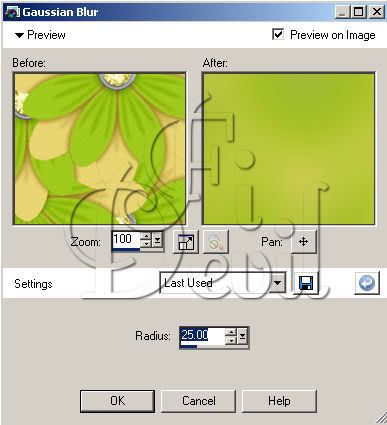
4. Now go to Adjust - Blur - Gaussian Blur and have the Radius settings at 25.00 and then click OK.
5. Open the Frame from your scrap kit and copy and paste to your image. Resize if needed. I resized mine by 85%.
6. Select your Magic Wand Tool and make sure your frame layer is selected, click on the inside of the frame. Now go to Selections - Modify - Expand - No of Pixels 3.
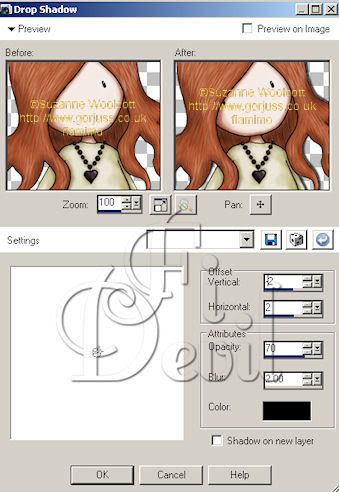
7. Select your tube you want to use for the centre of the frame and copy and paste as a new layer. Position where you want it to be in the middle of the frame. Now go to Selections - Invert and then hit your delete key. This will remove any excess image that was outside of the frame. Add a drop shadow to your tube. Go to Effects - 3D Effects - Drop Shadow. V= -2 & H= 2, O= 80 & Blur=2 colour Black.
Now position your tube below the Frame layer in your layers palette.
8. Postition your elements where you want them to be. Add your second tube and then add the © Information on your tag. I used Pixelette font Anti Alias off and size 8.
9. Add your name in your font of choice or the Monotype Corsiva which I used. Anti Alias set at Sharp and size 48 Pixels.
10. Save your tag as a .jpg and you are finished.
I hope you enjoyed doing my tutorial.
This tutorial was written on 3rd July 2008.
Any resemblance to another tutorial is purely coincidental.
©Fi_Devil Tutorials
Puppy Love

YOU WILL NEED:
* Paint Shop Pro. I used PSPXII but you should be able to make this tag in earlier versions.
* Tube of choice. I am using the artwork of Suzanne Woolcott. You will need a licence for her artwork which can be purchased from HERE
* Scrap Kit by Passionate-Scraps. Thank you Mandy for allowing me to use your fabulous kit Puppy Love. This is no longer for sale.
* Font of choice - I used Impact and Pristina
LETS START!
Open your scrap kit up and select the ellements you wish to use and open them up in psp and minimise. Select your papers from the scrap kit and minimise. Open the preset shape provided and minimise.
1. Start off with a blank canvas of 500 x 500 flood fill with white
2. On your blank canvas. Place your flower element in the centre of the canvas. Reduce the size of the flower, I reduced by 40%.
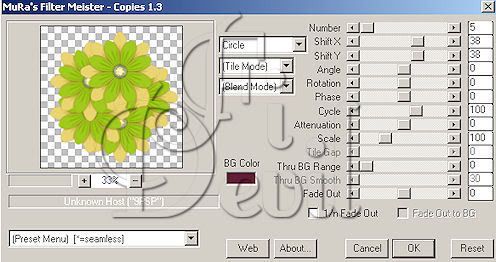
3. Go to Effects - Plugins - MuRa's Meisters - Copies - Circle. See settings below.
4. Next Maximise your preset shape. Copy the shape of choice and paste as a new layer in your canvas. Close your original image.
5. Using your magic wand tool, Select the preset shape till you have marching ants around the edges
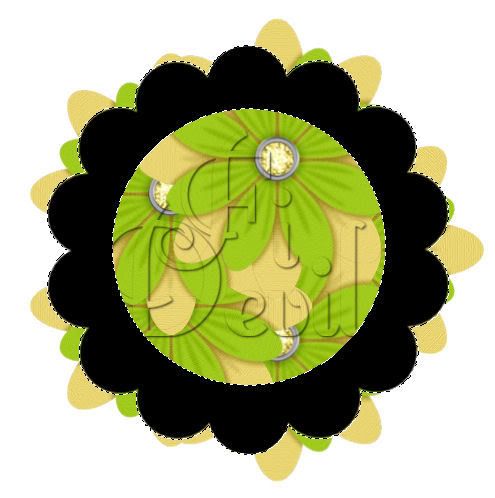
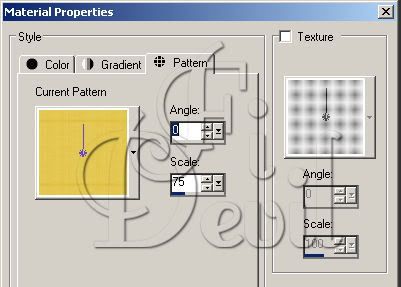
6. In the layers palette, duplicate the preset shape. Select the top shape and apply a colour that will compliment the colour scheme you have used. Floodfill the layer with this colour and while still selected. Select the next layer in the palette. In your materials palette, select the background colour of choice. I selected paper pattern 6 from my kit and set the properties as shown below.
7. Now select the top layer again and go to Selections - Modify - Contract - Contract by 2 pixels then hit delete. Now go to Selections - Select None. This is what you should have in your layers palette so far.
8. Activate your ribbon image and copy and paste to your image. Close the original copy. Resize this layer to fit the frame. I resized by 60%. Position where you like on the frame layer.
9. Select your magic wand tool and select the top layer of the frame outline. Ensure the marching ants are on the outside of the frame layer (see below).
10. Select the ribbon layer in the layer palette and then go to Selections - Invert. Hit the delet button. This should get rid of any excess ribbon outside of the frame. Go to Selections - Select None.
11. Now select your circle tool and draw out a circle to fit inside your framed layer. Make sure it is slightly larger than the inside of this frame. Now position this layer below the frame.
12. Select your tube and copy and paste onto the image. Resize to fit the frame. I reduced my tube by 65%. Position where you like it and apply drop shadow. Go to Effects - 3D Effects - Drop Shadow (see below)
13. Select the flower layer in the layers palette and right mouse click and duplicate. Select the bottom layer and go to Image - Resize - by 90%. Then go to Adjust - Blur - Gaussian Blur - by Radius 25.00 (see below).
14. Add your elements of choice on your tag. Apply drop shadow as above and Then apply your word art as desired.
15. Add your © Information and then your name and save your tag as a jpg. You are finished.
Thank you for trying my tutorial
This tutorial was written on 8th July 2008.
Any resemblance to another tutorial is purely coincidental.
©Fi_Devil Tutorials
Rock Devil
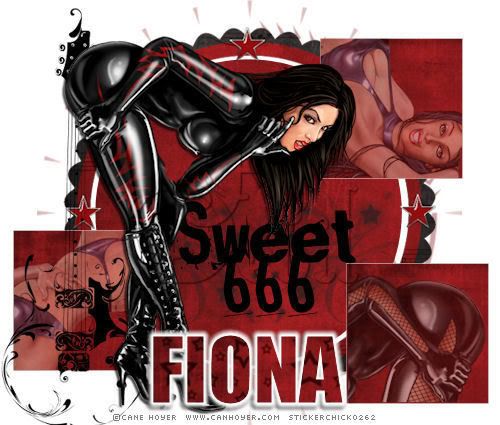
YOU WILL NEED:
* Paint Shop Pro. I used PSPXII but you should be able to make this tag in earlier versions.
* Tube of choice. I am using the artwork of Cane Hoyer. You can find his work HERE.
* Scrap Kit by Digital Chaos. Thank you Yarrow for allowing me to use your fabulous kit Rock Devil. You can purchase the kit HERE
* Font of choice - I used Impact. You can find it HERE if your computer doesnt have it already.
* Eyecandy Gradient Glow (You can substitute this for a white drop shadow).
* Mask of choice. I used nik-patches. Open and minimise to use later.
LETS START!
1. Open your tube and scrap kit in PSP. Open your font (by double clicking on it in Windows Explorer) and minimise to use later.
2. Open a new image 500 x 425 with a white background.
3. Add a new raster layer. Use a colour that will contrast with your tube and flood fill this layer.
4. Now go to Layers - New Mask Layer - From Image. Select your mask from the drop down list - Invert mask unticked - Source luminance selected. When it is how you want it, merge the group in your layers palette by right clicking on the mask layer and select Merge - Merge Group.
5. Select your preset shape tool and set to rectangle. Foreground colour set at white with the line width set at 1 with the background colour set at the same as the mask layer, I used a paper pattern 01 as the background to my rectangles. Draw out a rectangle for your tag and once it is the size you want convert to raster layer. Now duplicate this layer until you have 3 shapes.
6. Position where you want them to be. Now select the rectangle with your magic wand tool and position your tube where you want it to be. Select the tube layer in the layers palette and then go to Selections - Invert - Hit the delete button and this should just leave the tube in the selected area. Ruduce the opacity to 50% on the tube layer. Go to Selections and Select None. Do this to each of the rectangle layers.
7. Activate your frame image and copy and paste to your tag image. I used Frame2. Close the original image. Position on the tag where you would like it to be.
8. Select your Preset Shape tool again but in the Circle. With the forground set to white and the line width set to 7 and the background set to the patterned paper. I used paper pattern 01. Draw out the circle so that it still shows the white in the middle of the frame. Position this layer below the frame layer as shown below.
9. Now position the elements on your tag from your scrap kit and then add your tube to the tag as the top layer and apply drop shadow to the tube. I used V= 2, H= -2 O=70 Blur 2 colour black.
10. Add your ©Information and then add your name to the tag. Apply the Gradient glow to your name and then apply drop shadow as above.
11. Save your tag and you are now finished.
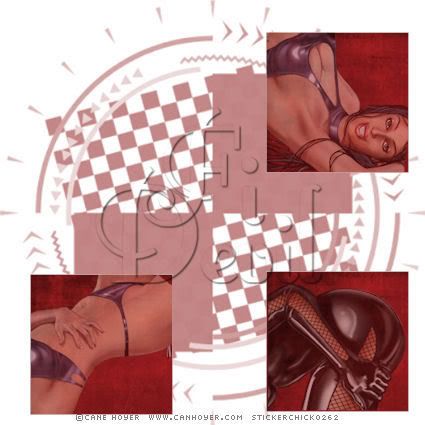
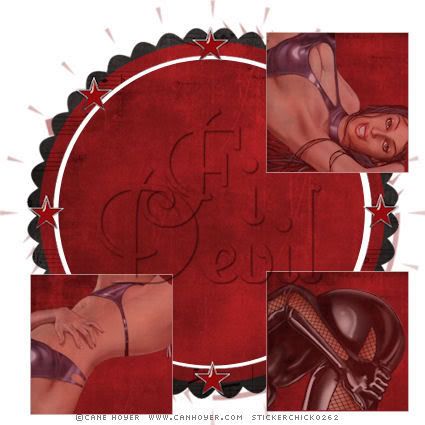
Here is a different version of the same tag.
I hope you enjoyed doing my tutorial.
This tutorial was written on 7th July 2008.
Any resemblance to another tutorial is purely coincidental.
©Fi_Devil Tutorials
This tutorial was written on 7th July 2008.
Any resemblance to another tutorial is purely coincidental.
©Fi_Devil Tutorials
Sex Kitten
YOU WILL NEED:
* Paint Shop Pro and Animation Shop or similar. I used PSPXII but you should be able to make this tag in earlier versions.
* Tube of choice. I am using the artwork of Elias Chatzoudis. You can find his work HERE
* Doodle of choice. I am using one from Sentimental Style. Please check out her blog HERE
* Font of choice - I used Toledo which is a Pay to use font, you can purchase it HERE
* Filters used were Xero Fritillary & Eyecandy Gradient Glow (can substitute with a white drop shadow).
* I made the frame myself so you can either make one yourself or you can use one from a scrap kit you have. Preset Shape was supplied by PSP.
LETS START!
1. Open your tube and scrap supplies in PSP. Open your font (by double clicking on it in Windows Explorer) and minimise to use later.
2. Open a new image 400 x 400 with a white background.
3. Add a new raster layer. Activate your Image with the Doodle and copy and paste to your tag and resize to about 75% and position where you would like it.

4. Select your Selection Tool and set to Preset Shape. Select the flower 5 shape you saved from the supplies. Once you have drawn out the shape. Open this layer up in the palette layer and change the colour of the shape. Foreground set at null and background set with a colour that will contrast with your tube. I used #bfd1f8. Okay these changes and now right click on the layers palette and convert to Raster Layer.
5. Postition where you would like it and then duplicate this layer two times until you have three shapes in your layers Palette.
6. Now go to Effects - Plugins - Xero - Fritillary. Using the settings below for the first layer.
7. Hide the first layer and then select the second layer and go to Effects - Plugins - Xero - Fritillary.
8. Hide the second layer and then select the third layer and apply the following settings.
9. Now hide the third layer and unhide the first layer. Here is what you should have so far.
10. You will want to add your tube, frame and embellishments as desired.
11. Once the name is on your tag. Right mouse click on the layer and convert to Raster layer. Go to Effects - Plugins - Eye Candy - Gradient Glow and apply settings set out below.
12. Now add the copyright information. Now go to Edit - Copy Merged.
13. Open up Animation Shop and go to Edit - Paste - Paste as new animation.
14. Go back to Paint Shop Pro and hide the first layer of the shape and unhide the second layer. Go to Edit - Copy Merged.
15. Go to Animation Shop and go to Edit - Paste - After Current Frame. Do the same for the third layer.
Save your tag as a gif and you are finished.
I hope you enjoyed doing my tutorial.
This tutorial was written on 30th May 2008.
Any resemblance to another tutorial is purely coincidental.
©Fi_Devil Tutorials
Wild Thing
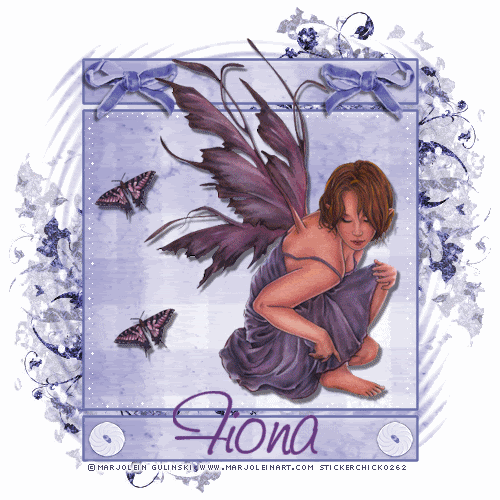
YOU WILL NEED
* Paint Shop Pro and Animation Shop or similar. I used PSP XII but you should be able to make this tag in earlier versions.
*You will need a tube of choice. I chose the wonderful work of Marjolein Gulinski.
*You can find her work here at My PSP Tubes
*Mask of choice. I used a mask from Here. tp_mask 7.
*Scrap Kit Vintage Rose by Farrah. This kit is no longer available in her store.
*Kit supplied (with permission) Here
LETS START!
1. Open all your supplies in PSP. Open your font (by double clicking on it in Windows Explorer) and minimise to use later.
2. Open a new image 500 x 500 with a white background.
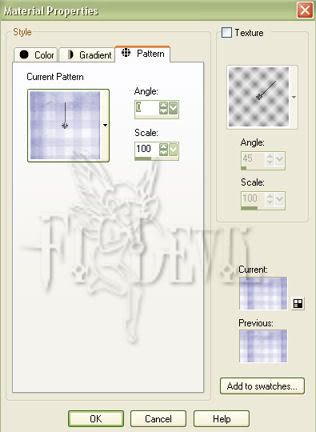
3. Add a new raster layer. Activate your Flood Fill Tool. In your colour palette change your Foreground colour to Pattern. Select the patterned paper from the scrap kit or a colour that blends with your tube.
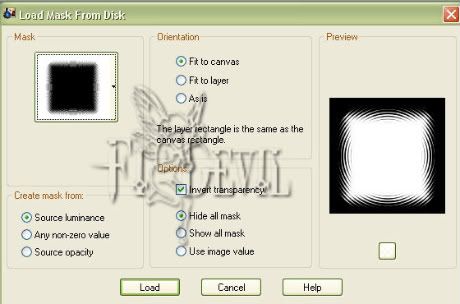
4. Go to Layers - New Mask Layer - from Image - select the mask of your choice with the settings as shown in the image below.
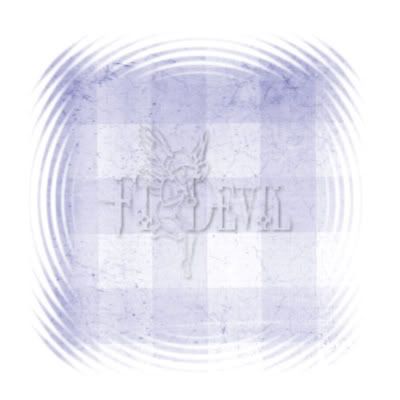
Your image should look something like this.
5. Select the element of choice. I selected the Vintage Rose Doodle. Copy and paste as a new layer. Close the original image.
Right mouse click on the layer with the frame and duplicate. Now go to Image - Flip - Image - Mirror.
Your image should now look like this.

6. Select your tool selection set to Rectangle with the foreground selection as a darker shade from your tube and the background set
to the paper pattern you previously used for the mask layer or a contrasting shade. Draw out the rectangle for about half of the image size.
Once this is done, convert this layer to a raster layer.

7. Now with the rectangle tool, draw out a smaller rectangle above the larger rectangle. As shown below.

8. Copy this layer and then go to Image - Flip. Position the layer to just below the bottom of the middle rectangle as shown below.

9. Place your tube on the tag and add embelishments as you desire. See the finished tag at the beginning of the tutorial. Hide the embelishments and the image. Go to Edit - Copy Merged.
10. Now go to Animation shop. Now go to Edit - Paste as a New Animation. Now you will need to duplicate this layer to be the same as the animation. Edit - Propagate Paste - Next go to Edit - Duplicate Selected. Do this till you have the same amount of images as there is in the animated tiles. Now go to Edit - Select all - Edit - Copy. Now go to your tag and do the same. Edit - Select All. Now go Edit - Paste - Into Selected Frame. Place where you want on the tag. When you are finished, save this as a gif image.
11. Go back to PSP and unhide the embellishments and the tube. Now you will need to hide the background layer and the doodles and rectangle layers.
12. Go to Edit - Copy Merged and then go to Animation Shop select the tag. Edit - Select All. Edit - Paste into Selection.
Place this layer as you would like them.
Now save your tag.
13. Go back to PSP and put your © information on the tag and add your name.
14. Follow the previous steps to add this information to your animated tag.
Save your tag and you are finished.
I hope you enjoyed doing my tutorial.
This tutorial was written on 20th May 2008.
Any resemblance to another tutorial is purely coincidental.
©Fi_Devil Tutorials
Subscribe to:
Posts (Atom)
