My Blinkies
Feel free to grab my blinkie to display on your blog.


My Creative Team

Tut Writers Inc.

CT Member for


10 April 2010
Pirates Alive

This tutorial was written for those who have a working knowledge of Paint Shop Pro.
YOU WILL NEED:
* Paint Shop Pro. I used PSPXII but you should be able to make this tag in earlier versions.
* Tubes of choice. I am using the artwork of Keith Garvey. You can get it at PTE.
* Scrap Kit by the talented Yarrow. Thank you Yarrow for allowing me to use your great Kit. This kit can be purchased Here.
* Font of choice - I used Monotype Corsiva. This is one of the Windows fonts so you should have it. If not you can purchase it Here.
LETS START!
1. Open your tubes and scrap kit in PSP. Open your font (by double clicking on it in Windows Explorer) and minimise to use later.
2. Open a new image 500 x 500 with a white background.
3. Activate your selection tool and click on the square preset shape. Make sure your Foreground is set to Null and the Background is set to a contrasting colour to your tube. I used #C6B190. Draw out the size you want.

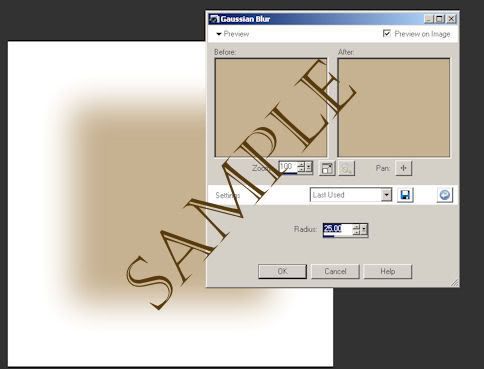
4. Now go to Adjust - Blur - Gaussian Blur and have the Radius settings at 25.00 and then click OK.
5. Open the Frame from your scrap kit and copy and paste to your image. Resize if needed. I resized mine by 85%.

6. Select your Magic Wand Tool and make sure your frame layer is selected, click on the inside of the frame. Now go to Selections - Modify - Expand - No of Pixels 3.
7. Select your tube you want to use for the centre of the frame and copy and paste as a new layer. Position where you want it to be in the middle of the frame. Now go to Selections - Invert and then hit your delete key. This will remove any excess image that was outside of the frame. Add a drop shadow to your tube. Go to Effects - 3D Effects - Drop Shadow. V= -2 & H= 2, O= 80 & Blur=2 colour Black.
Now position your tube below the Frame layer in your layers palette.
8. Postition your elements where you want them to be. Add your second tube and then add the © Information on your tag. I used Pixelette font Anti Alias off and size 8.
9. Add your name in your font of choice or the Monotype Corsiva which I used. Anti Alias set at Sharp and size 48 Pixels.
10. Save your tag as a .jpg and you are finished.
I hope you enjoyed doing my tutorial.
This tutorial was written on 3rd July 2008.
Any resemblance to another tutorial is purely coincidental.
©Fi_Devil Tutorials

Subscribe to:
Post Comments (Atom)

0 comments:
Post a Comment