My Blinkies
Feel free to grab my blinkie to display on your blog.


My Creative Team

Tut Writers Inc.

CT Member for


10 April 2010
Pretty in Pink
This tutorial was written for those with a working knowledge of PSP
Written for PSP 9 (will work in other versions)
Supplies Needed
Mask of choice, mine was from a resource center which is no longer available.
Fonts of choice - I used Regular you can find it here
I also used Pristina (this is a paid for font)
Tube of choice
I used the lovely artwork of © Oren Kramek which you can purchase from MPT
Remember to save often
1. Open up an image with transparent background flood fill with white.
2. Open up the mask supplied and minimise.
3. Create a new raster layer and flood fill with a background colour
to match your tube. I used #a57799 now go to layers, new mask layer, from image and
select the mask, (I used) tp_edge15 from the drop down list. Tick the box to source luminance and invert mask data. In your layers palette delete the mask layer and merge group.
4. Using two colours from your tube, set your foreground colour to another
dark shade on your tube and the background to a lighter shade in your tube.
5. Now select your circle shape and with the line width set to 3 and line style as solid draw out your circle so that it covers a good portion of the tag.
6. Select your tube you are going to use for the tag and go to >Image - Resize - Increase the size so that the image will not be distorted but large enough to fill the circle. I enlarged my image in the second image by 150%.
7. Select your magic tool and select the circle. Go to your tube and copy the tube and paste as a new layer on your tag. Make sure that your tube layer is still active.
8. Go so selections - select Invert then hit your delete button.
Now reduce the opacity of the image.
9. Hide all the other layers in your layer palette other than the circle and the image and then go to Layers - Merge - Visible.
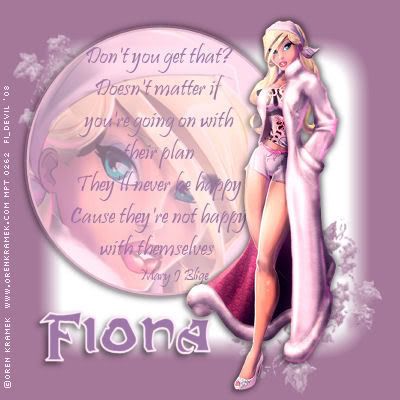
10. Select a dark colour from your tube and type in the lyrics from a song you like. I chose the lyrics from Mary J Blige. Using a font of your choice. I used Pristina font set at size 14.
Don't you get that?
Doesn't matter if
you're going on with
their plan
They'll never be happy
Cause they're not happy
with themselves.
Doesn't matter if
you're going on with
their plan
They'll never be happy
Cause they're not happy
with themselves.
11. Resize your tube to fit onto your tag and place where you would like it.
I resized mine by 85%. Apply drop shadow to the image. Effects - 3D Effects - Drop Shadow - V3 & H-3 - O50 & Blur 8. Make sure that shadow on new layer is unticked.
12. Now add your © copyright information and your name I used Regular font size 48 for my name, using the dark colour for the background colour and contrasting colour for the stroke width set at 2. Apply the same drop shadow to your name. Go to Layers - Merge - Merge all (Flatten) and save as a jpg image.
You are finished.
I hope you enjoyed doing my tutorial.
This tutorial was written on 4th January, 2008.
Any resemblance to another tutorial is purely coincidental.
© Fi_Devil Tutorials
This tutorial was written on 4th January, 2008.
Any resemblance to another tutorial is purely coincidental.
© Fi_Devil Tutorials

Subscribe to:
Post Comments (Atom)

0 comments:
Post a Comment