My Blinkies
Feel free to grab my blinkie to display on your blog.


My Creative Team

Tut Writers Inc.

CT Member for


10 April 2010
Sex Kitten
YOU WILL NEED:
* Paint Shop Pro and Animation Shop or similar. I used PSPXII but you should be able to make this tag in earlier versions.
* Tube of choice. I am using the artwork of Elias Chatzoudis. You can find his work HERE
* Doodle of choice. I am using one from Sentimental Style. Please check out her blog HERE
* Font of choice - I used Toledo which is a Pay to use font, you can purchase it HERE
* Filters used were Xero Fritillary & Eyecandy Gradient Glow (can substitute with a white drop shadow).
* I made the frame myself so you can either make one yourself or you can use one from a scrap kit you have. Preset Shape was supplied by PSP.
LETS START!
1. Open your tube and scrap supplies in PSP. Open your font (by double clicking on it in Windows Explorer) and minimise to use later.
2. Open a new image 400 x 400 with a white background.
3. Add a new raster layer. Activate your Image with the Doodle and copy and paste to your tag and resize to about 75% and position where you would like it.

4. Select your Selection Tool and set to Preset Shape. Select the flower 5 shape you saved from the supplies. Once you have drawn out the shape. Open this layer up in the palette layer and change the colour of the shape. Foreground set at null and background set with a colour that will contrast with your tube. I used #bfd1f8. Okay these changes and now right click on the layers palette and convert to Raster Layer.
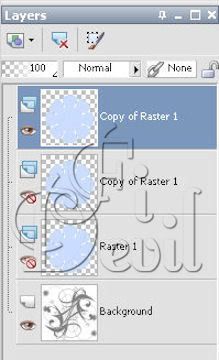
5. Postition where you would like it and then duplicate this layer two times until you have three shapes in your layers Palette.
6. Now go to Effects - Plugins - Xero - Fritillary. Using the settings below for the first layer.
7. Hide the first layer and then select the second layer and go to Effects - Plugins - Xero - Fritillary.
8. Hide the second layer and then select the third layer and apply the following settings.
9. Now hide the third layer and unhide the first layer. Here is what you should have so far.

10. You will want to add your tube, frame and embellishments as desired.
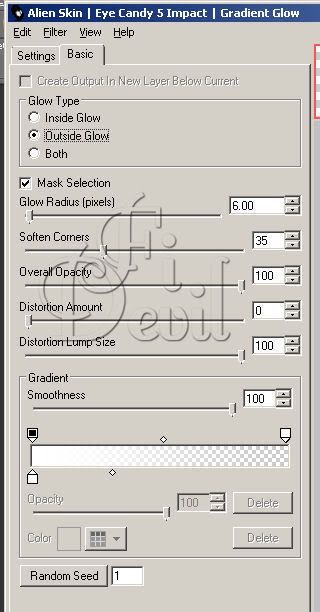
11. Once the name is on your tag. Right mouse click on the layer and convert to Raster layer. Go to Effects - Plugins - Eye Candy - Gradient Glow and apply settings set out below.
12. Now add the copyright information. Now go to Edit - Copy Merged.
13. Open up Animation Shop and go to Edit - Paste - Paste as new animation.
14. Go back to Paint Shop Pro and hide the first layer of the shape and unhide the second layer. Go to Edit - Copy Merged.
15. Go to Animation Shop and go to Edit - Paste - After Current Frame. Do the same for the third layer.
Save your tag as a gif and you are finished.
I hope you enjoyed doing my tutorial.
This tutorial was written on 30th May 2008.
Any resemblance to another tutorial is purely coincidental.
©Fi_Devil Tutorials

Subscribe to:
Post Comments (Atom)

0 comments:
Post a Comment