My Blinkies
Feel free to grab my blinkie to display on your blog.


My Creative Team

Tut Writers Inc.

CT Member for


31 January 2011
Oh Happy Day

Items Needed:
This tutorial was written for those with a working knowledge of Paint Shop Pro.
Paint Shop Pro (I used PSP X, but any version will work just fine).
Animation Shop or Photoshop.
Im using the fabulous scrap kit Happy Days by the wonderful CBJ. You can purchase it HERE. Thank you Jo for this gorgeous kit.
You will need two or three tubes one close up and one or two other tubes by the same artist.
I chose Elias Chatzoudis. You will need a licence to use his artwork. You can purchase them HERE.
Filters - I used Xenofex 2 - Constellation & Texture Effects - Weave.
Mask of choice
Lets Begin:
Open a transparent 500 x 500 image
Copy and paste a frame to your canvas. I chose the Flower Doodle Frame 2. Select your Magic wand tool and select inside the frame. Go to selections - Modify - Expand - Expand by 3. Leaving the inside of the frame selected, place your tube in the centre and highlight the tube.
Select Selections - Invert - Hit your delete key. This will remove the excess tube from your tag. Selections - Deselect.
I used Paper 9 for the rectangle. Close off the foreground colour and make your rectangle as large as you need it.
Once you have your rectangle to the size you need. Apply your filter.
Effects - Texture Effects - Weave - with the following settings - Gap 1, Width 4, Opacity 14, Fill gaps ticked, Weave & Gap colour #FFFFFF
Place elements on your tag where they look the best.
Add your © layer to your tag.
Merge your layers together - Layers - Merge - Merge Visible.
Once you have your tag has been merged. Go to Layers - New Raster Layer - Blend mode normal.
Move this layer to the bottom of the layers pallette and name it background.
Select a contrasting colour from your tubes and highlight the background layer on your layers palette. Select the paint tool and flood fill your background layer with your contrasting colour.
Now go to Layers - Load/Save Mask - Load Mask from Disk. Apply your mask and merge group.
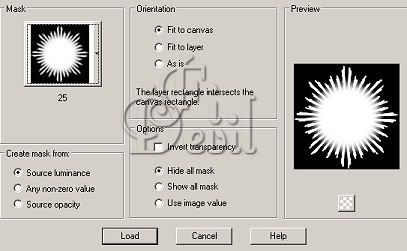
Highlight the mask layer and duplicate it twice so that you now have three layers with the mask on it.
Now go to Effects - Plugins - Xenofex 2 - Constellation with the following settings.
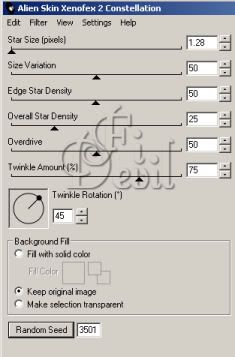
Close off the first layer and then select the second mask layer. Change the Random Seed. Close off this layer and then select the last mask layer changing the Random Seed again.
Duplicate your tag layer two times and move them so that there is a mask layer under each one.
Create a new layer and flood fill with White. Duplicate this layer two times and place under each layer of your tag.
If you want to keep it as a static tag skip the multiple layers and merge and save as a JPG or PNG. Add your name and you are done.
To animate your tag, save your tag as a PSD file so you can open it in Animation Shop.
Open Animation Shop and open your tag.
You should have three frames, now save as a GIF.
You have finished.
Thank you for trying my tutorial.
This tutorial was written by me on Monday 31st January 2011 and any similarity to any other tutorial is purely unintentional.
Tutorial by ©FiDevil Tutorials
Subscribe to:
Post Comments (Atom)

0 comments:
Post a Comment