My Blinkies
Feel free to grab my blinkie to display on your blog.


My Creative Team

Tut Writers Inc.

CT Member for


17 July 2010
Oh Happy Day

You Will Need
*Paint Shop Pro - I used PSPX but any version will work just as well.
Tube of choice. I used the fabulous work of Keith Garvey which can be found here.
*Scrap Kit of choice - I used a fabulous PTU kit from CBJ called Happy Days,
which can be purchased here.
* Filters needed - Penta.com & Alien Skin Xenofex 2 - Constellation.
*Mask of choice - I used 2 (you can just use the one).
*Font of choice. - I used 1 BeanSprout DNA
Lets get started
1. Open a new transparent background 550 x 550
2. This next step is purely as a personal choice. You dont need to use two masks. For the first mask. Fill the canvas with a colour of choice and apply your mask. Layers - Load/Save Mask - Load Mask from Disk - Select your mask and OK. In the layers palette, highlight the main image and then go to the top of your window and select Layers - Merge - Merge Group.
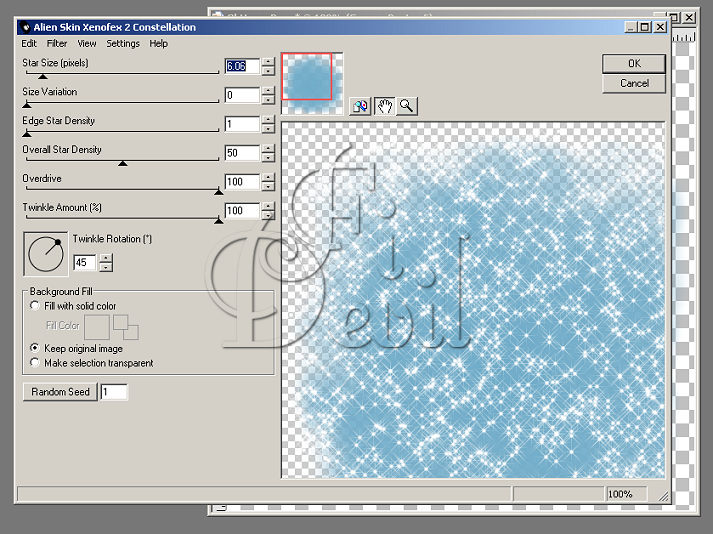
3. Add a new layer. Layers - New Raster Layer - Call this one Secondary Background Layer. Select the mask you want for this one and merge layer as instructed above. Now to apply the filter. Go to Effects - Plugins - Alien Skin Xenofex 2 - Constellation. Apply the settings as shown below. You can have a play around and see what appeals to you.
4. Place your frame and elements on the background. Next select your Rectangle Tool and set your background palette to a colour that will compliment your tube and draw out a shape to the size you desire.
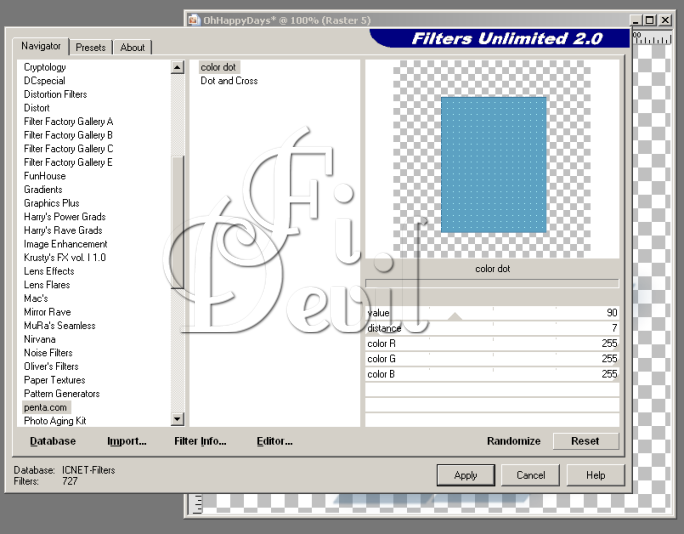
5. Now apply your filter to this Rectangle. I converted the rectangle to raster layer and then applied Penta Dot filter.Effects - Plugins - Filters Unlimited - Penta.com - Colour Dot - with the following settings.
6. Next add your tube and position to your satisfaction. Now add the © Copyright information.
7. Next I then selected a paper from the kit and selected it as the background colour in the Materials Palette. I then selected the Eclipse tool and drew out an oval shape which I softened by adding a bit of a blur to it. Adjust - Blur - Gaussian Blur and Radius set to 25 - OK.
8. Add your name with font of choice my font was set to 55 - Anti Alias Sharp in the colour #b84a83. Now save your tag as a JPG or PNG file.
You are now finished.
I hope you enjoyed doing my tutorial.
This tutorial was written on 18th July 2010.
This is my own work and not copied from any other tutorial.
Any resemblance to any other tutorial is purely coincidental.
©FionaDevil Tutorials
Spring Fever

What you will need
* Paint Shop Pro. I used PSPX but any version will do the job just fine.
* Tube of choice. I used the fantastic work of Legends Art which can be found here.
* Scrap kit of choice. I used the fabulous Spring is Sweet by CBJ and it can be found here.
* Font used - Adios Script Pro but you can use any font of choice.
* Mask of choice. I used dmsk0006.
Lets get started
1. Open all your elements you want to use in your tag and hold down the shift key + D to copy your elements and close the originals.
2. Open a new transparent image 500 x 500. Select a colour you would like to use for the background. I used CBJ_SIS_Paper 13. Select your Mask you want to use and apply it to your tag. I reduced the transparency to 50%
3. Place your element you want to use on the background layer and resize to fit the tag. I used CBJ_SIS_Leaves.
4. Next select your Rectangle Tool with the foreground set to a darker contrasting colour to the Background colour. I used #adc5ea for the foreground stroke width set to 3 with #e0eaff set for the background colour and draw out a rectangle to a size you are happy with.

5. Now place your elements on your tag till you are satisfied with the way it looks.

6. Now place your tube on your tag adding a slight drop shadow to give it more of a deeper feel. I used Vertical 2 - Horizontal -2 with Opacity at 45 blur 2 black as the colour. Arange as you would like it.
Now add the © copyright information.

7. Add your name with your font of choice and save your tag as either a PNG or JPG.
Here is another version of the tag but with another of my favourite artists Elias Chatzoudis.

You are now finished.
I hope you enjoyed doing my tutorial.
This tutorial was written on 17th July 2010.
This is my own work and not copied from any other tutorial.
Any resemblance to any other tutorial is purely coincidental.
©FionaDevil Tutorials
16 July 2010
Be Self Aware

YOU WILL NEED
* Paint Shop Pro - I wrote this tutorial using PSPX but you should be able to make your tag in earlier versions.
* Tube of choice. I am using the artwork of Elias Chatzoudis. You can find his work here.
* I am using a gorgeous kit called Think Pink by CBJ. You can find it here.
* Font of choice - I used Ruach LET which you can download here.
* Wordart by me, you can find it here.
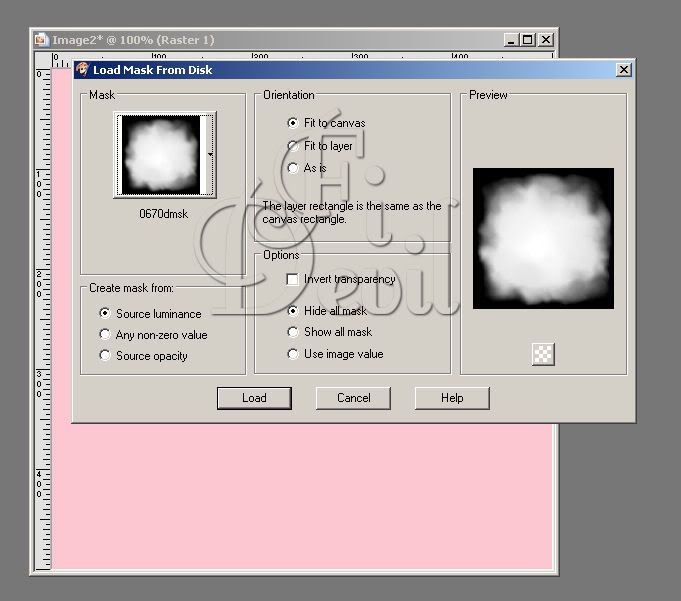
* Mask of choice. I am using Mask 0670dmsk. If this is your mask, please let me know so I can credit you correctly.
LETS START
1. Open your tube and scrap supplies in PSP. Open your font (by double clicking on it in Windows Explorer) and minimise to use later.
2. Open a new Image 500 x 500 with a transparent background.
3. Add a new raster layer. Flood fill with a contrasting colour in your tube. I chose #fcc7d2.
4. To apply your mask of choice go to Layers - Load/Save Mask - Load Mask from Disk - Select your mask from the drop down list - Load. Right mouse click on the layers palette and Merge Group.
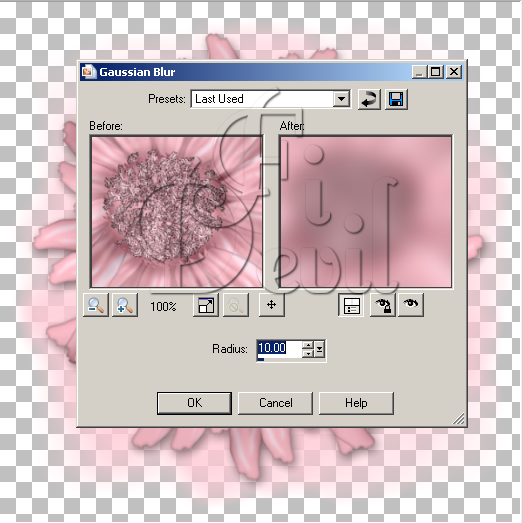
5. Place your element you are using for the background where you want it to appear on your tag. Duplicate your element. Make sure your element is selected in the layers and then go Layers - Duplicate. Then go to Adjust - Blur - Gaussian blur with the following settings.
6. Add your frame of choice to the background and then your tube.
7. Once you have your tube place where you want it. Select your eraser tool and erase the frame where the head is positioned if you desire.

8. Add other elements to your tag and then add the © information.
9. Copy and paste the Wordart provided or use any other kind of wordart to your tag. Position where you want it to be.

10. Add your name with your font of choice. With contrasting colour. I used #800080.
11. Save as a PNG or JPG file and you have your tag. You are now finished
I hope you enjoyed doing my tutorial.
This tutorial was written by me on 14th July 2010.
Any resemblance to any other tutorial is purely coincidental.
©FionaDevil Tutorials
Subscribe to:
Posts (Atom)
