About Me
Copyright Text
Blog Layout Created By Fiona Devil
Artwork by ©Arthur Crowe
My Blinkies
Feel free to grab my blinkie to display on your blog.


Chat Box
Powered by Blogger.
02 December 2011
Holly Berries - FTU
You will need:
Paint Shop Pro. I used PSPXI but any version will work just as well.
Tube of choice. I am using the fantastic art by Ismael Rac. You will need to have a license to use his work. You can purchase it from here.
Scrap kit of choice. I am using the wonderful kit FTU Holly In Snow (Sampler) from Scrap CandyStore which can be found here.
Mask of choice. Im using this gorgeous mask MB&SW-mask12 by Moonbeams and Spiderwebs. You can get it here.
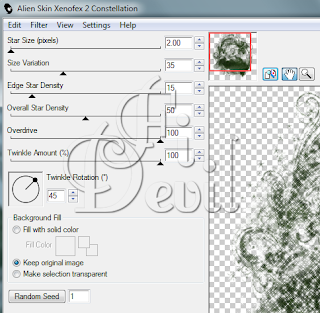
Filters used: Alien Skin Xenofex 2 Constellation.
Lets begin:
First off open a blank canvas of 500 x 500
Flood fill with a colour of choice matching your tube or as I did, I used 3PD_HIS_Sampler paper3 reduced by 75%. Apply your mask. Copy your mask and hide the second one for now.
Open your frame of choice, I chose the 3PD_HISSampler_Frame1 and reduced by 65%. Apply a drop shadow. O2, H-2, O50, B2 Black.
Paste your tube to the canvas and reduce to fit your frame. Apply a drop shadow as above. If you wanted to place your tube so that the top part was sitting on the top of the frame select your Selection tool with the settings as below.
Carefully remove the parts of the tube you dont want showing above the frame. Or you can duplicate your tube, placing one above the frame and the other below and just erase the parts on the top layer you dont want showing.
Add your elements. I added my own creation of Holly Berries along with the elements supplied in the kit.
To save it, click on the image and right click and save to your computer.
Now unhide your second mask layer and move it under the first layer.
Select your mask and go to Effects - Plugins - Xenofex 2 - Constellation with the following settings.
Add your © Information to your tag and your name.
Save your tag as either a PNG or JPG.
You are now finished.
Thank you for trying my tutorial.
This tutorial was written by me on 2nd December 2011.
Any resemblance to other tutorials is purely coincidental.
©Fi_Devil Tutorials
Labels:
Tutorial
Subscribe to:
Post Comments (Atom)


0 comments:
Post a Comment