About Me
Copyright Text
Blog Layout Created By Fiona Devil
Artwork by ©Arthur Crowe
My Blinkies
Feel free to grab my blinkie to display on your blog.


Chat Box
Powered by Blogger.
23 October 2011
Dark Mistress
This tutorial was written for those with a working knowledge of Paint Shop Pro.
What you will need:
* Paint Shop Pro (PSP) I used PSP XII for mine but any version will work fine.
* Animation Shop or PhotoShop (PS). (I prefer to animate in PS as the images aren't as grainy)
* Tube(s) of choice, I used the fabulous work of Ismael Rac. You will need a license to use his work, please done use his art without one. You can purchase it here.
* Scrap Kit of choice. I used the fabulous Dark Mistress kit by Alison from Hungry Hill Scraps. You can purchase it here.
* Mask of Choice. I used my favourite one dmsk0670 (I'm not sure where you can get it but if it is yours, please let me know so I can give you the credit for it).
* Font of choice - I used Burtons Nightmare 2000. You can get it here
* Filters used - Alien Skin Xenofex 2.0 - Lightening & Alien Skin Eye Candy 5 - Impact - Gradient Glow
Lets Begin:
Lets start off with a 500 x 500 blank canvas.
Select either a paper from your scrap kit or flood fill with #000000. Now apply your mask. Close the mask layers. Multiply this layer by 5.
Go to Effects - Plugins - Alien Skin Xenofex 2.0 - Lightening and apply the settings as seen below to your first layer.
Close off this layer and select your next layer. Go back to Effects - Lightening and click on the Random Seed, this will change the lightening. Close off this layer and select the next, do this to all remaining layers till they all have the lightening on them.
Select your tubes you want to use. You can use only one if that is what you wish.
Copy and paste your tubes to your canvas and arrange where you think they look best. Add a drop shadow to your tube(s) I used the following settings: V1, H -1, O50, B2 colour set to Black.
Now open your scrap kit and use the elements you chose for your tag. Adding the drop shadow.
Add the Copyright © information to your tag. I placed mine on the tube so that no-one could rip your tag and add their name to it. Do your © in white and add the drop shadow in black then change the blend mode to soft light and place on the tube in a discreet postition.
Add your name and apply your gradient glow filter to it and add a drop shadow.
Save your Tag as a PSD file.
Now merge all visible. Your mask layers all should have been hidden.
You do not want to merge that layer to the rest of them yet.
Multiply your tube layer so that you have equal layers to match the mask layers.
Unhide all the mask layers and position a tube layer above each mask. Select the top one and go to Layers - Merge - Merge down. Do this to all of the layers so you should have 5 layers with the tubes on top.
Save your tag.
Now either open up Ani Shop or Photoshop and apply the animation to your tag.
In animation shop you need to go to Animation -select all. Once all your layers are selected, go to Animation - Frame Properties - Change the display time to 30 select OK.
Your tag is now complete. Save as a Gif file and you are done.
If you want to animate your tag in Photoshop, follow these steps.
Open your PSD file in PS and you should have a screen like mine.
If you dont see the animation frame on the bottom of your screen,
go to Window and make sure Animation is selected.
Now select the upside down triangle on the bottom right of your screen
Once you select this, you should be able to see the following image.
Select Make Frames From Layers and your tag layers all should show in the bottom window.
Make sure the first image is highlighted and hold your shift key down and then click on the last tag. This should now highlight all of your tag frames.
Now select the upside down arrow at the bottom of the image
Click on Other and select 0.3 to set your timing for your animations.
Once you have done this, click on the first frame and then go to File up at the top left hand of your screen
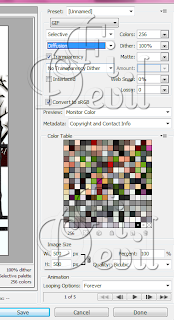
Select Save for Web & Devices.
This will take you to the Animations window.
On the bottom of this screen, you can see a play button. Click on this to test the speed of your animations. If the speed isnt right, cancel out of that screen and do the speed again to one that suites you.
If your animations are set to the right speed, Click on Save and save the file to your hard drive.
This version is un-animated.
This version is un-animated.
You are now finished making your tag.
I hope you enjoyed doing my tutorial.
This tutorial was written on 23 October 2011.
Any resemblance to another tutorial is purely coincidental.
©Fi_Devil Tutorials
Labels:
Tutorial
Subscribe to:
Post Comments (Atom)


0 comments:
Post a Comment