My Blinkies
Feel free to grab my blinkie to display on your blog.


My Creative Team

Tut Writers Inc.

CT Member for


03 December 2010
Mask #3 & #4

I sat down one day and just pumped out a whole load of Masks. I will be loading them one at a time as the week progresses. This is one that I really like the way it turned out. I hope you can use them for your creations.


Here is the next one that I did, using the same theme but slightly different.

New Template - Snow Flakes
I finally completed my first template for my blog. I started it yesterday afternoon, but decided to get it completed so I can post to my blog. Here it is and you can find it on the Template page to download. I did get a little inspiration from all the snow that is falling in the northern hemisphere so wanted to create just for the moment. I so wish we could experience a white Christmas just once here in Australia, but knowing human nature, we would probably complain bitterly about it Hahahaha


Please leave a comment letting me know how you like it.
24 November 2010
Spirit Of Christmas

This tutorial is written for those with a working knowledge of PSP.
I wrote this tutorial on 23 November 2010 and any resemblance to other tutorials is purely by coincidence and not intentional.
Things you need:
I used PSP X but can be made in earlier versions just as well.
I used the wonderful art of Simon Han and can be purchased at PTE. You will need a license to use this art but you can use any tube in your tag.
I used Template #196 by Blissfully Beth found Here
Scrap kit used is Spirit Of Christmas and can be found at CBJ's store Here. Thanks Jo for your fantastic kit.
Mask of choice. I used 0670dmsk but you can use whatever you feel fits.
Font of choice. I used P22ZanerOne which is a Pay to Use font and you can find it Here.
Wordart by me. Can be found Here. Right click and Save As.
Eye Candy Impact
Lets get started.
1. First off open your template by holding the shift and D and copy and close the original.2. Go to your Materials Pallet and select the Foreground colours and change to a colour that will compliment your tube. I used Paper5. Highlight the first circle and go to Selections - Select All - Float - Defloat. Create a new Raster Layer and then colour this layer with the colour or paper you have chosen for your circle. Deselect.
3. Select your next circle and follow the same steps you took to re-colour the first circle.
4. Once you have your circles how you want them, I then applied a glass effect by going to Effects - Plugins - Eye Candy - Impact - Glass. See settings below.

5. Select your elements you want to add to your tag and copy and paste to your tag. Place them where you want them to be.
6. Position your tube where you want it and add the copyright information on your tag. Make sure it is clear and easy to read. I used Pixelette size 8 anti alias off. I pasted the tube in the middle of the small circles and then applied a texture effect to them.

7. Add you name to your tag using your font of choice. I used P22ZanerOne size 105, anti alias sharp, bold, stroke width 1.0 font colour #765600 then I used Eye Candy Gradient Glow with the following settings.

8. Save your tag as a PNG or a JPG. Your tag is now finished.
Thank you for having a go at this one. I hope you enjoyed doing my tutorial.
Tutorial by Fiona Devil 2010
09 October 2010
Glow Of Autumn
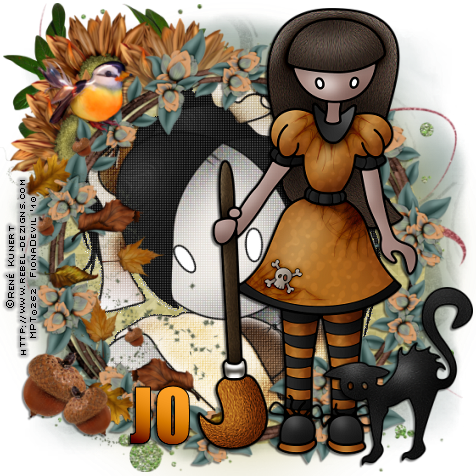
This tutorial was written for those with a working knowledge of Paint Shop Pro.
This tutorial was written by me and any resemblance to any other is purely coincidental.
Tutorial written on Friday 8th October 2010.
What you will need:
Paint Shop Pro - I used PSP X but any version will work.
I'm using the gorgeous artwork of René Kunert which can be purchased from PTE and you need a license to use it. You can purchase the tube from HERE
Filters Needed - Bordure Mania - Ellipse & Graphics Plus - Cut GlassMask of choice
Font used -
Let’s get started
Open up a transparent canvas 650 x 650
Select your flood fill tool and fill the canvas with the paper, I used CBJ_GOA_P20.
Select Layers – Load/Save Mask – Load Mask from Disk. Select your mask.
I had the Invert transparency unticked, then merged group.
Next I selected a frame. I used CBJ_GOA_E_Floral Frame
Place the frame on your canvas and reduce the size by 85% Add a drop shadow to your frame.
Effects - 3D Effects - Drop Shadow - V 2, H -2, O 50, Blur 2.00 Colour Black.
Open the Papers folder and select paper
I then selected the CBJ_GOA_P7 Paper and selected the Ellipse tool and drew out a circle
to the size of the frame.
Place this behind the frame.
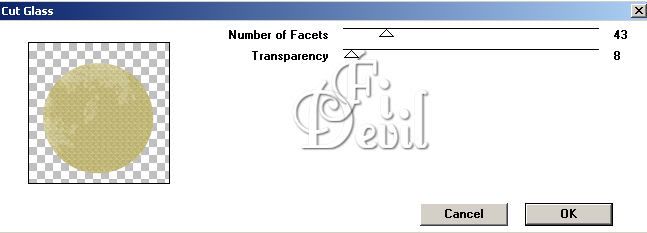
I then went to Effects - Plugins - Graphics Plus - Cut Glass to the settings below
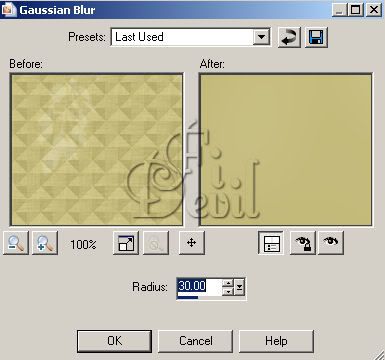
Duplicate the paper layer and go to Adjust - Blur - Guassian Blur Radius set at 30.00
I then selected the SwirlGitter3 and placed this behind the frame and paper, position where you like it best. I then selected GlitterSpill2 and placed this under the SwirlGlitter3.
I then placed the elements of choice around the frame and once this was the way I liked it, I then added the gorgeous artwork of René Kunert. Resize your tag by 85% if you choose to do so.
Add the correct © Information to your tag. I used Ambitsek font set to 8 Pixels, Anti-Alias Off, colour set to #000000.
Now add your name with your font of choice. I used Impact set to 72 pixels. I used #FFA329 for the colour of the font with line width of 1.00 Black Anti-Alias Sharp. Now convert to Raster layer. Go to Effects - Bordure Mania - Ellipse - Then apply your filter as shown below.
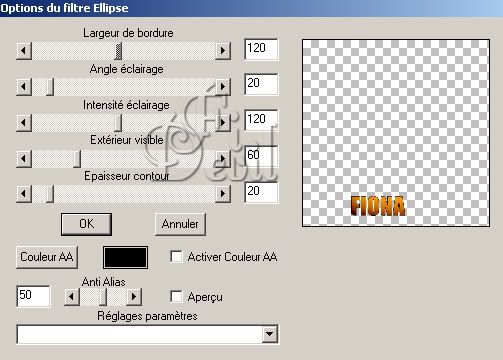
Once your name is as you want it, apply Drop shadow the same as you did for the frame.
Your tag is now complete. Save as a PNG or JPG.
I hope you enjoyed doing this tutorial.
Feel free to email me your results HERE
©FionaDevil Tutorials
Subscribe to:
Posts (Atom)